Securing SAP UI5 Applications with a Node.js Backend and JWT
Add JWT authentication and role-based access control to SAP UI5 with a custom Node.js Express backend — no BTP or XSUAA required.
Table of Contents
When SAP UI5 runs against a custom Node.js backend — rather than an SAP BTP service — there is no XSUAA, no OAuth flow, and no managed session layer. Security has to be built explicitly. JSON Web Tokens are the right tool for this job: stateless, cryptographically signed, and natively understood by both Express middleware and the browser’s fetch API.
This guide covers the complete stack:
- MySQL — user table with bcrypt-hashed passwords and role columns
- Node.js / Express — JWT generation at login, protected routes via middleware
- SAP UI5 — token storage in
sessionStorage, role-based routing, authenticated API calls, session expiry handling - Development proxy —
ui5.yamlconfiguration so the UI5 dev server forwards/apirequests to Node.js
How JWT Works
Think of JWT like a wristband at a venue. The first time you enter you show your ID (email and password). The staff checks it, then hands you a wristband. For the rest of the night you just show the wristband — the staff trusts it because the venue issued it and it cannot be faked.
In this setup:
- The UI5 app POSTs credentials to
/api/user/login - The backend verifies the password against the stored bcrypt hash
- If valid, the backend signs a JWT containing
user_id,email, androle - The UI5 app stores the token in
sessionStorageand sends it as aBearerheader on every subsequent request - Each protected Express route passes the token through a middleware guard that verifies the signature
Because the token is signed with a secret key only the server knows, it cannot be forged or modified.
Project Structure
project-root/
├── backend/
│   ├── .env                      ← Secret key and DB credentials
│   ├── server.js                 ← Express entry point
│   ├── repo/
│   │   └── dbconnection.js       ← MySQL connection
│   ├── middleware/
│   │   └── authMiddleware.js     ← JWT verification guard
│   ├── controller/
│   │   ├── userController.js     ← Login with bcrypt
│   │   └── adminController.js    ← Protected data API
│   └── routes/
│       ├── userRoutes.js         ← Public routes (/login)
│       └── adminRoutes.js        ← Protected routes
└── frontend/
    ├── ui5.yaml                  ← Dev server config + API proxy
    └── webapp/
        ├── controller/
        │   ├── View1.controller.js
        │   ├── AdminDashboard.controller.js
        │   └── UserDashboard.controller.js
        ├── view/
        │   ├── App.view.xml
        │   ├── View1.view.xml
        │   ├── AdminDashboard.view.xml
        │   └── UserDashboard.view.xml
        └── manifest.json
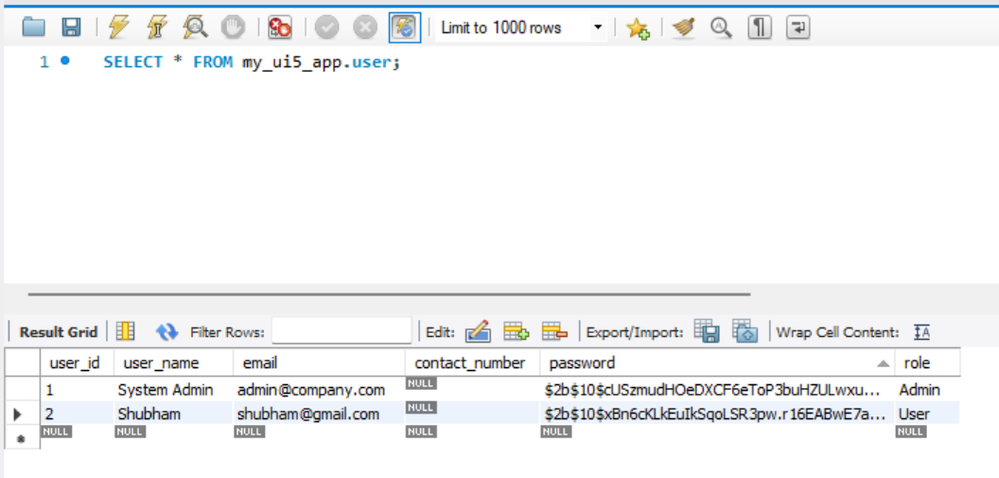
Step 1: MySQL Schema
Install MySQL Community Server and Workbench, then create the database and user table:
CREATE DATABASE my_ui5_app;
USE my_ui5_app;

CREATE TABLE `user` (
  `user_id`        INT NOT NULL AUTO_INCREMENT,
  `user_name`      VARCHAR(100) NOT NULL,
  `email`          VARCHAR(100) NOT NULL,
  `contact_number` VARCHAR(15) DEFAULT NULL,
  `password`       VARCHAR(255) NOT NULL,
  `role`           VARCHAR(20) DEFAULT 'User',
  PRIMARY KEY (`user_id`),
  UNIQUE KEY `email_UNIQUE` (`email`)
);
Important: never store plain-text passwords. Use bcrypt to generate hashes before inserting test users. Create a one-time utility script generateHash.js:
const bcrypt = require('bcrypt');
async function generateHashes() {
    const adminHash = await bcrypt.hash('Admin@123', 10);
    const userHash  = await bcrypt.hash('User@123',  10);
    console.log('Admin hash:', adminHash);
    console.log('User hash: ', userHash);
}
generateHashes();
Run it once (node generateHash.js), copy the output hashes, and use them in your INSERT statements.
Step 2: Backend Setup
mkdir backend && cd backend
npm init -y
npm install express mysql2 jsonwebtoken bcrypt dotenv
Create .env in the backend root (never commit this file):
DB_HOST=localhost
DB_USER=root
DB_PASSWORD=your_mysql_password
DB_NAME=my_ui5_app
SECRET_KEY=your_very_long_random_secret_key_here
PORT=3000
repo/dbconnection.js — MySQL pool:
const mysql = require('mysql2');
require('dotenv').config();

const connection = mysql.createConnection({
    host:     process.env.DB_HOST,
    user:     process.env.DB_USER,
    password: process.env.DB_PASSWORD,
    database: process.env.DB_NAME
});

connection.connect(err => {
    if (err) { console.error('DB connection failed:', err.message); return; }
    console.log('Connected to MySQL');
});

module.exports = connection;
server.js — Express entry point:
const express = require('express');
const dotenv  = require('dotenv');
dotenv.config();

const userRoutes  = require('./routes/userRoutes');
const adminRoutes = require('./routes/adminRoutes');

const app  = express();
const PORT = process.env.PORT || 3000;

app.use(express.json());
app.use('/api/user',  userRoutes);
app.use('/api/admin', adminRoutes);
app.get('/api/health', (_req, res) => res.json({ status: 'ok' }));

app.listen(PORT, () => console.log(`Backend running at http://localhost:${PORT}`));
Step 3: Login API with bcrypt and JWT
controller/userController.js — verifies credentials and issues a signed token:
const jwt    = require('jsonwebtoken');
const bcrypt = require('bcrypt');
const db     = require('../repo/dbconnection');

async function loginUser(req, res) {
    const { email, password } = req.body;
    if (!email || !password)
        return res.status(400).json({ message: "Email and password are required." });

    db.query('SELECT * FROM user WHERE email = ?', [email], async (err, results) => {
        if (err)
            return res.status(500).json({ message: "Internal server error." });
        if (results.length === 0)
            return res.status(401).json({ message: "Invalid email or password." });

        const user = results[0];
        const match = await bcrypt.compare(password, user.password);
        if (!match)
            return res.status(401).json({ message: "Invalid email or password." });

        const token = jwt.sign(
            { user_id: user.user_id, email: user.email, role: user.role },
            process.env.SECRET_KEY,
            { expiresIn: '24h' }
        );

        return res.status(200).json({
            message: "Login successful",
            token,
            user: { role: user.role, name: user.user_name }
        });
    });
}

module.exports = { loginUser };
routes/userRoutes.js:
const express       = require('express');
const router        = express.Router();
const { loginUser } = require('../controller/userController');

router.post('/login', loginUser);
module.exports = router;
Step 4: JWT Middleware Guard
middleware/authMiddleware.js — this runs before every protected controller:
const jwt = require('jsonwebtoken');

const verifyToken = (req, res, next) => {
    const authHeader = req.headers['authorization'];

    if (!authHeader || !authHeader.startsWith('Bearer '))
        return res.status(403).json({ message: "Access denied. No token provided." });

    const token = authHeader.split(' ')[1];

    jwt.verify(token, process.env.SECRET_KEY, (err, decoded) => {
        if (err)
            return res.status(401).json({ message: "Session expired or invalid token." });
        req.user = decoded;
        next();
    });
};

module.exports = { verifyToken };
Apply it to protected routes by inserting it between the path and the controller:
// routes/adminRoutes.js
const express            = require('express');
const router             = express.Router();
const { verifyToken }    = require('../middleware/authMiddleware');
const { getItemDetails } = require('../controller/adminController');

router.get('/getItemDetails', verifyToken, getItemDetails);
module.exports = router;
controller/adminController.js — a protected data endpoint:
const db = require('../repo/dbconnection');

function getItemDetails(req, res) {
    db.query('SELECT * FROM user', (err, results) => {
        if (err) return res.status(500).json({ message: "Internal server error." });
        return res.status(200).json(results);
    });
}

module.exports = { getItemDetails };
Step 5: Frontend — manifest.json
Add sap.ui.layout to the libraries block (required for SimpleForm):
"libs": {
    "sap.m": {},
    "sap.ui.core": {},
    "sap.ui.layout": {}
}
Replace the routing section with three routes — login, admin dashboard, and user dashboard:
"routing": {
    "config": {
        "routerClass": "sap.m.routing.Router",
        "controlId": "app",
        "controlAggregation": "pages",
        "viewType": "XML",
        "async": true,
        "viewPath": "ui5nodeapp.view"
    },
    "routes": [
        { "name": "RouteLogin",          "pattern": "",      "target": ["TargetLogin"] },
        { "name": "RouteAdminDashboard", "pattern": "admin", "target": ["TargetAdminDashboard"] },
        { "name": "RouteUserDashboard",  "pattern": "user",  "target": ["TargetUserDashboard"] }
    ],
    "targets": {
        "TargetLogin":          { "id": "View1",          "name": "View1",          "viewLevel": 1 },
        "TargetAdminDashboard": { "id": "AdminDashboard", "name": "AdminDashboard", "viewLevel": 2 },
        "TargetUserDashboard":  { "id": "UserDashboard",  "name": "UserDashboard",  "viewLevel": 2 }
    }
}
Step 6: Development API Proxy
The UI5 dev server runs on port 8080; the Node.js backend on port 3000. Configure ui5.yaml to forward all /api traffic to Node.js so the browser never makes cross-origin requests during development:
server:
  customMiddleware:
    - name: fiori-tools-proxy
      afterMiddleware: compression
      configuration:
        backend:
          - path: /api
            url: http://localhost:3000   # Forward all /api calls to Node.js
        ui5:
          path:
            - /resources
            - /test-resources
          url: https://ui5.sap.com
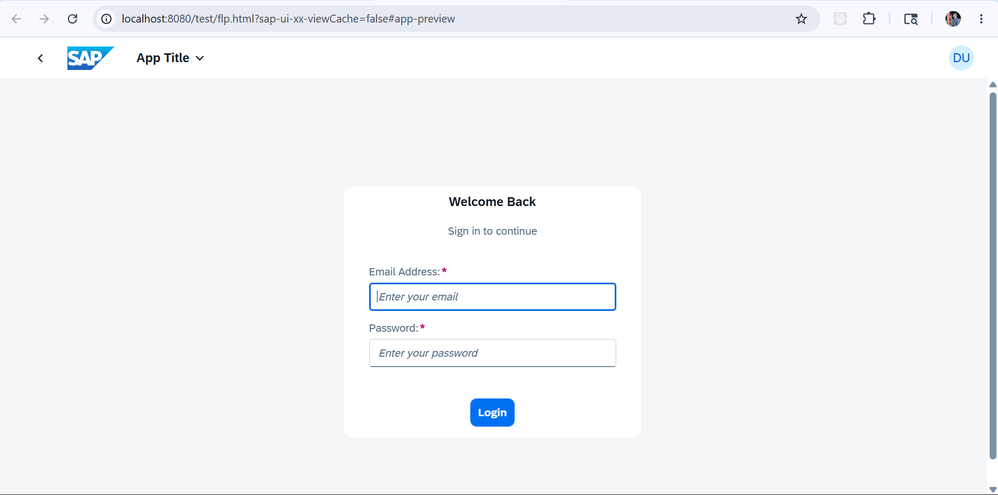
Step 7: Login View
view/View1.view.xml — a centered login panel with email and password fields:
<mvc:View controllerName="ui5nodeapp.controller.View1"
    xmlns:mvc="sap.ui.core.mvc"
    xmlns="sap.m"
    xmlns:f="sap.ui.layout.form"
    displayBlock="true">
    <Page title="Login" showHeader="false">
        <content>
            <VBox justifyContent="Center" alignItems="Center" height="100%">
                <Panel width="380px">
                    <VBox alignItems="Center">
                        <Title text="Welcome Back" level="H2"/>
                        <Label text="Sign in to continue"/>
                    </VBox>
                    <f:SimpleForm editable="true" layout="ResponsiveGridLayout"
                        columnsL="1" columnsM="1">
                        <f:content>
                            <Label text="Email Address" required="true"/>
                            <Input id="loginUserId" placeholder="Enter your email"
                                   type="Email" width="100%" submit=".onLoggedIn"/>
                            <Label text="Password" required="true"/>
                            <Input id="loginPassword" placeholder="Enter your password"
                                   type="Password" width="100%" submit=".onLoggedIn"/>
                        </f:content>
                    </f:SimpleForm>
                    <VBox alignItems="Center">
                        <Button text="Login" type="Emphasized"
                                width="100%" press=".onLoggedIn"/>
                    </VBox>
                </Panel>
            </VBox>
        </content>
    </Page>
</mvc:View>
Step 8: Login Controller
controller/View1.controller.js — POSTs credentials, stores the token, and routes by role:
sap.ui.define([
"sap/ui/core/mvc/Controller",
"sap/m/MessageToast"
], function (Controller, MessageToast) {
"use strict";
return Controller.extend("ui5nodeapp.controller.View1", {
onLoggedIn: async function () {
const sEmail = this.byId("loginUserId").getValue().trim();
const sPassword = this.byId("loginPassword").getValue();
if (!sEmail || !sPassword) {
MessageToast.show("Please enter both email and password.");
return;
}
try {
const response = await fetch("/api/user/login", {
method: "POST",
headers: { "Content-Type": "application/json" },
body: JSON.stringify({ email: sEmail, password: sPassword })
});
const result = await response.json();
if (!response.ok) throw new Error(result.message || "Login failed.");
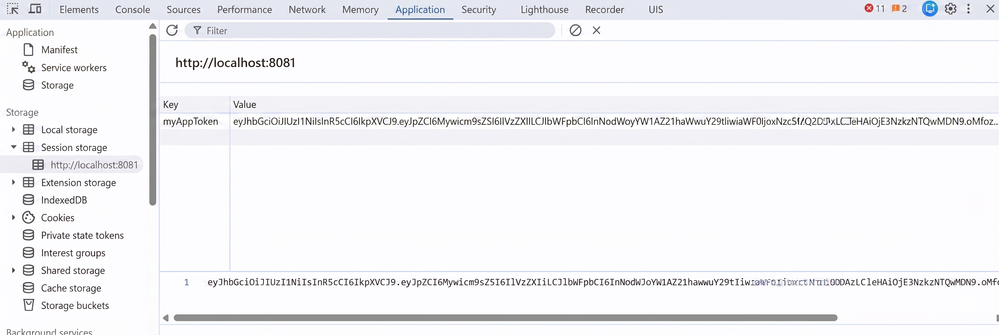
// sessionStorage clears the token automatically when the tab closes
sessionStorage.setItem("myAppToken", result.token);
sessionStorage.setItem("myAppUser", JSON.stringify(result.user));
const oRouter = this.getOwnerComponent().getRouter();
oRouter.navTo(result.user.role === "Admin"
? "RouteAdminDashboard"
: "RouteUserDashboard");
} catch (error) {
MessageToast.show(error.message || "Something went wrong.");
}
}
});
});
Step 9: Authenticated API Calls from the Dashboard
Every protected API call reads the token from sessionStorage, attaches it as a Bearer header, and handles expiry by redirecting back to the login screen:
sap.ui.define([
    "sap/ui/core/mvc/Controller",
    "sap/ui/model/json/JSONModel",
    "sap/m/MessageToast"
], function (Controller, JSONModel, MessageToast) {
    "use strict";
    return Controller.extend("ui5nodeapp.controller.Dashboard", {
        onInit: function () {
            this.loadSecureData();
        },

        loadSecureData: async function () {
            const token = sessionStorage.getItem("myAppToken");
            if (!token) {
                this._redirectToLogin("No active session. Please log in.");
                return;
            }

            try {
                const response = await fetch("/api/admin/getItemDetails", {
                    method:  "GET",
                    headers: {
                        "Accept":        "application/json",
                        "Authorization": "Bearer " + token
                    }
                });

                if (response.status === 401 || response.status === 403) {
                    this._redirectToLogin("Your session has expired. Please log in again.");
                    return;
                }
                if (!response.ok) throw new Error("Failed to load data.");

                const data = await response.json();
                this.getView().setModel(new JSONModel(data), "secureData");
            } catch (error) {
                MessageToast.show(error.message);
            }
        },

        _redirectToLogin: function (message) {
            sessionStorage.removeItem("myAppToken");
            sessionStorage.removeItem("myAppUser");
            MessageToast.show(message);
            this.getOwnerComponent().getRouter().navTo("RouteLogin");
        },

        onLogout: function () {
            this._redirectToLogin("You have been logged out.");
        }
    });
});
Security Notes
sessionStorage vs localStorage: sessionStorage was chosen because it clears automatically when the browser tab is closed, which reduces the exposure window on shared machines. Both are vulnerable to XSS, so add a Content Security Policy header in production.
HTTPS is mandatory in production: JWTs in transit are only as safe as the channel they travel over. Local HTTP is acceptable during development; deploy behind HTTPS everywhere else.
Token expiry: The 24-hour window suits most internal tools. For anything more sensitive, reduce it to 1–2 hours and consider a refresh token mechanism.
Role enforcement on the backend: The UI5 role-based routing (Admin → AdminDashboard, User → UserDashboard) is a UX decision, not a security control. Role checks must be repeated on the backend for every protected endpoint.
Summary
| Layer | Technology | Responsibility |
|---|---|---|
| Database | MySQL + bcrypt | Store users with hashed passwords and roles |
| Backend | Node.js / Express + jsonwebtoken | Issue JWTs at login, verify them on protected routes |
| Frontend | SAP UI5 | Store token, attach it to API calls, handle expiry |
| Dev tooling | ui5.yaml proxy | Forward /api to Node.js without CORS overhead |
This pattern covers everything needed to secure a UI5 application without a managed identity provider — from the database schema and password hashing through token issuance, middleware protection, and frontend session management.
Lena Fischer
SAP UI5 & Full-Stack Developer
Berlin-based developer focused on SAP UI5 and custom backend integrations. Works across the full stack — from database schema and Node.js APIs to SAPUI5 views and controllers — with a strong emphasis on practical security patterns.